Creating a Life OS Dashboard Setup in Obsidian for 2024(Part 1)
It’s important to get your life on paper. If you don’t write your goals and plans, chances are you will not very far.
You have heard enough times how important it is to set goals. I’m not going to do it here again.
With the idea of goal setting, as I talked about in the previous article, I’m creating a Dashboard setup in Obsidian to help me plan and track my life.
I’m calling it a Life OS.
Yeah, I’ve inherited the name from the many Notion templates and Dashboards I see online.
This is going to be a series of articles showing you how I created this setup. I will share the demo vault at the end so you can experiment and easily adapt this setup for you.
Elements in My Dashboard Setup
Below are the different elements that are part of my setup. This will be a detailed guide on how everything is set up.
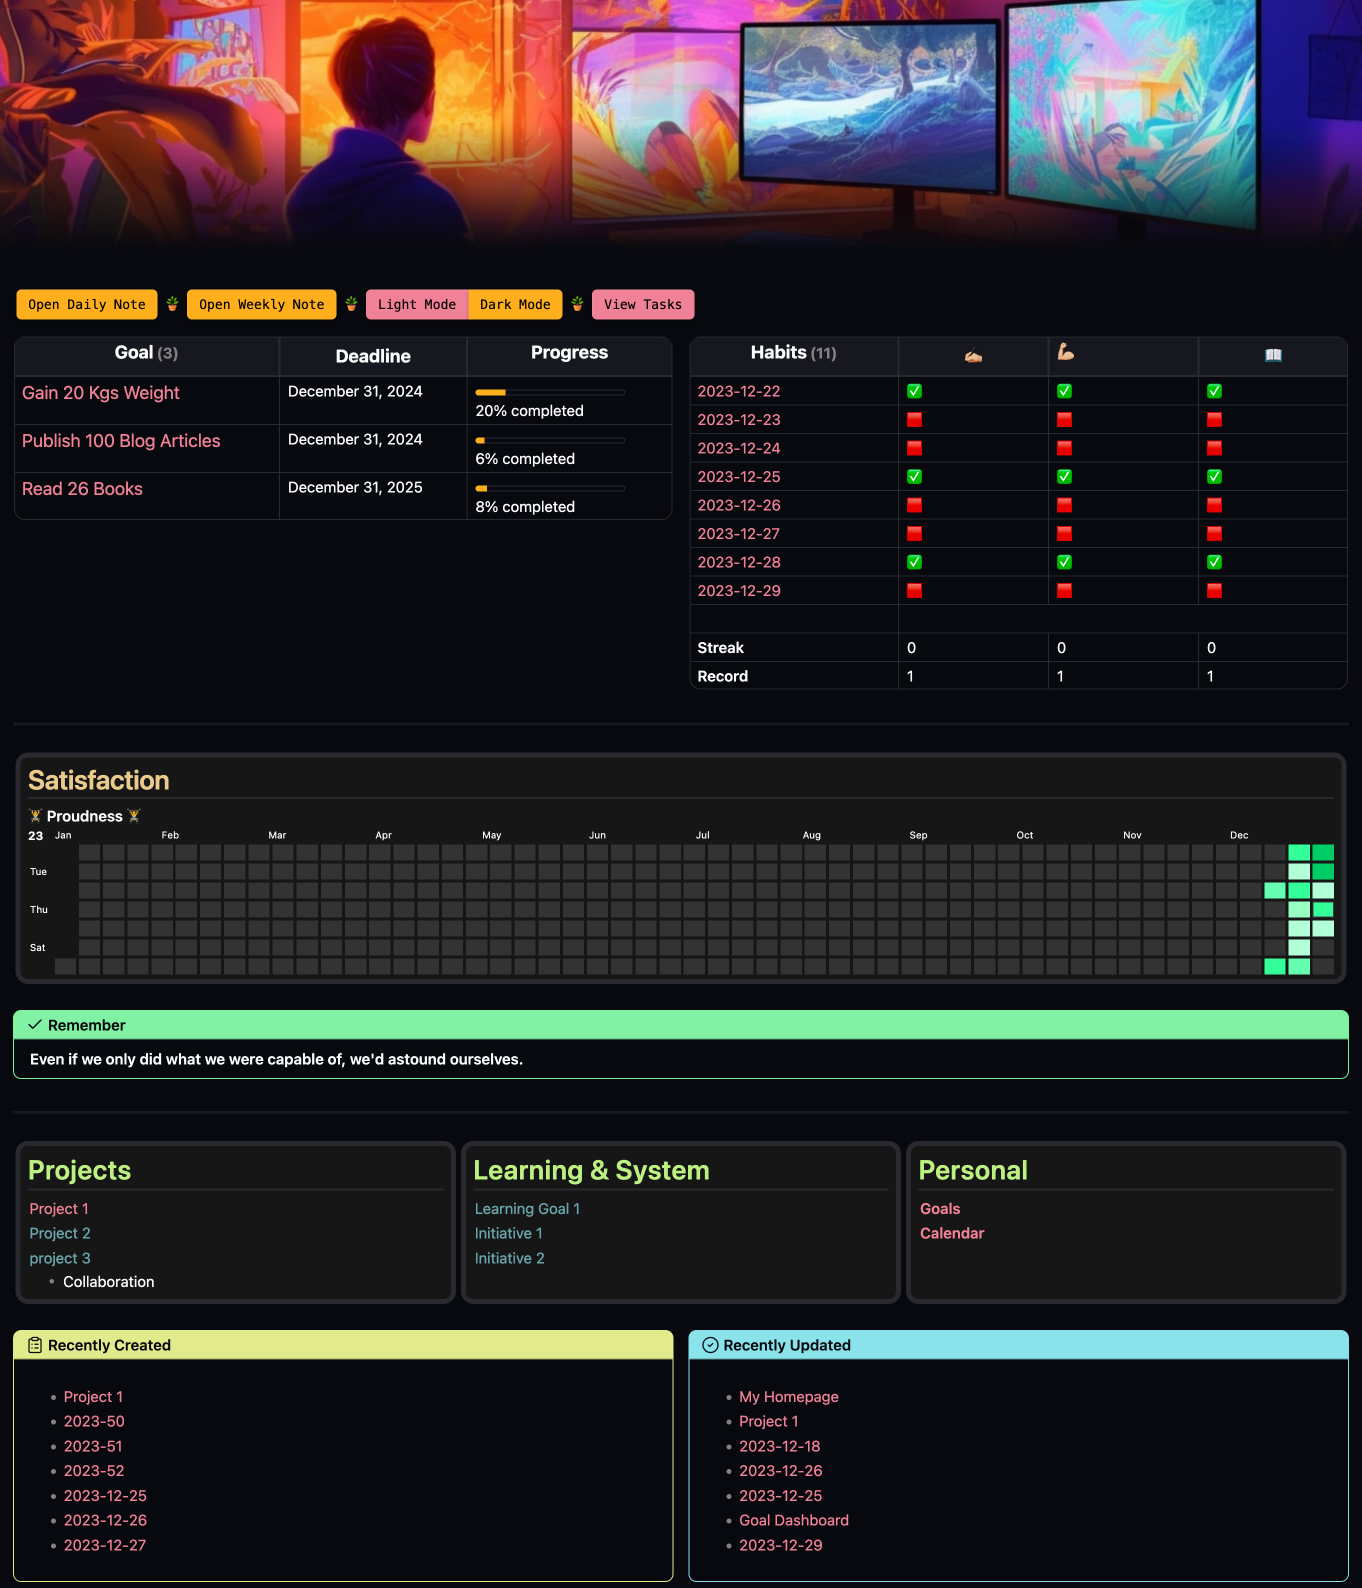
My Homepage
This is the center hub. With all the important notes in a neatly organized fashion.
It contains buttons for different commands. A goal tracker, habit tracker dashboard, heatmap calendar view of a property called proudness (which will explain the concept in the next article).
Finally, a multi-column view with a link to important notes and a dataview query showing recently created and updated notes.
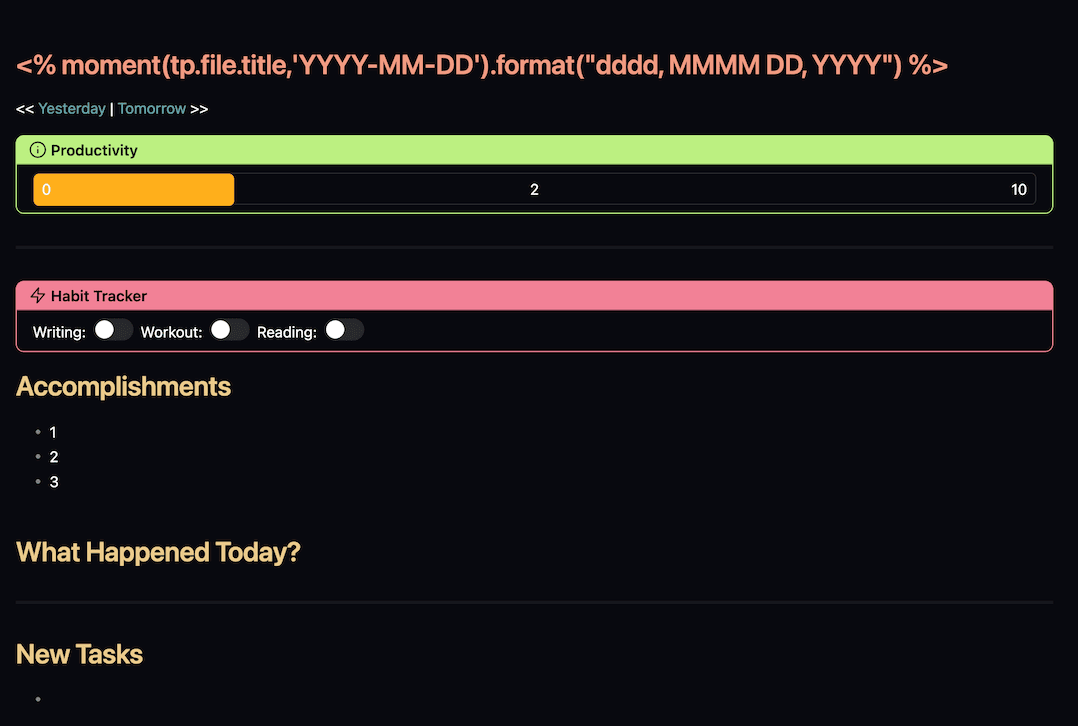
Daily note template
This is a template for my daily note. It contains a habit tracker and a productivity tracker. And also a journaling template at the end.
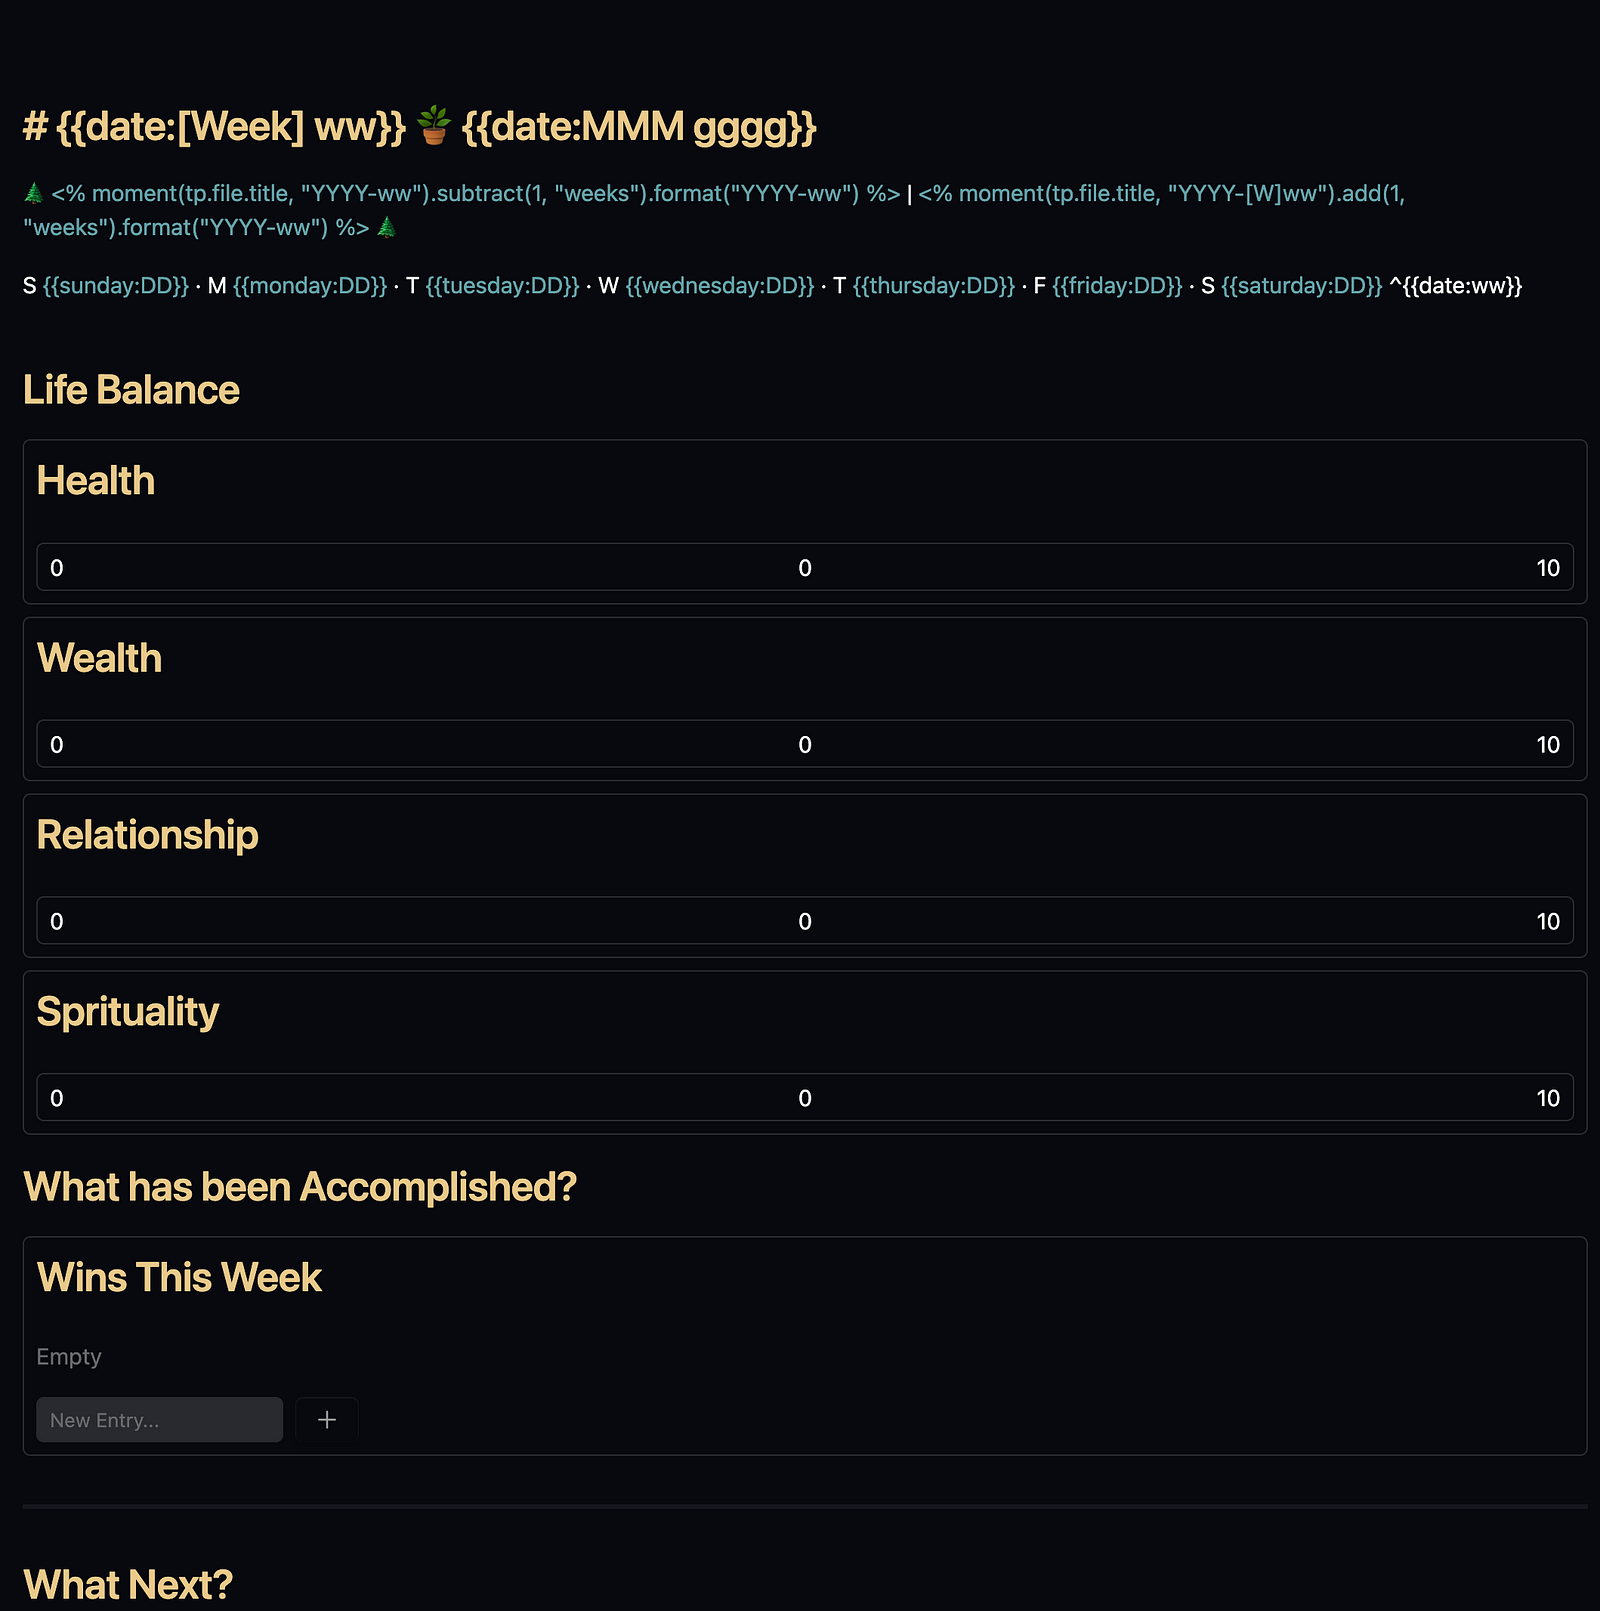
Weekly note template
This is a simple weekly note template with a life balance tracker and a simple journaling prompt at the end.
Goal setting template
This is a template for setting goals. The one you see on the homepage is queried with dataview from notes created with this template.
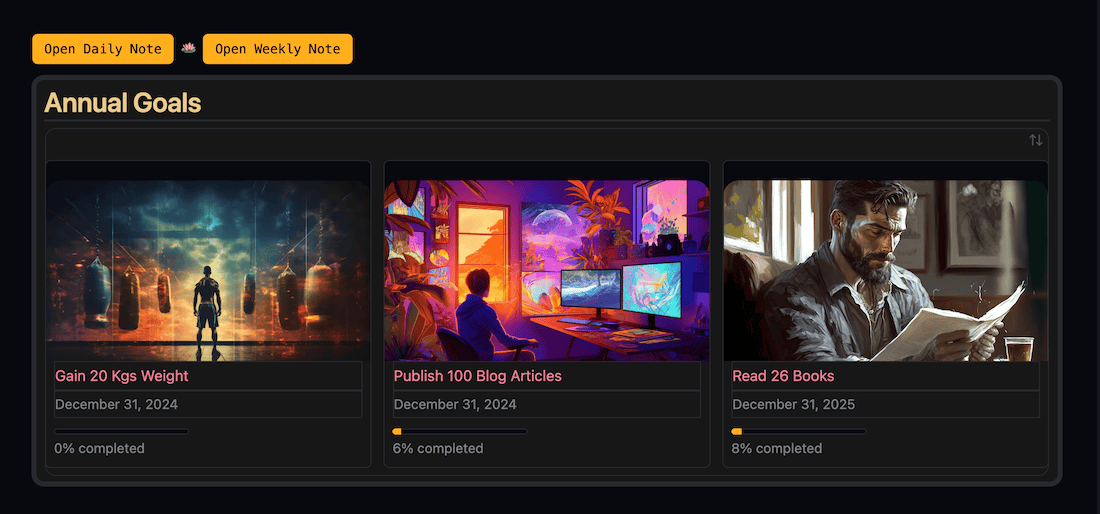
Goal Dashboard
This is a different view of the goals created with the help of dataview. It also has a button to open daily notes and weekly notes at the top.
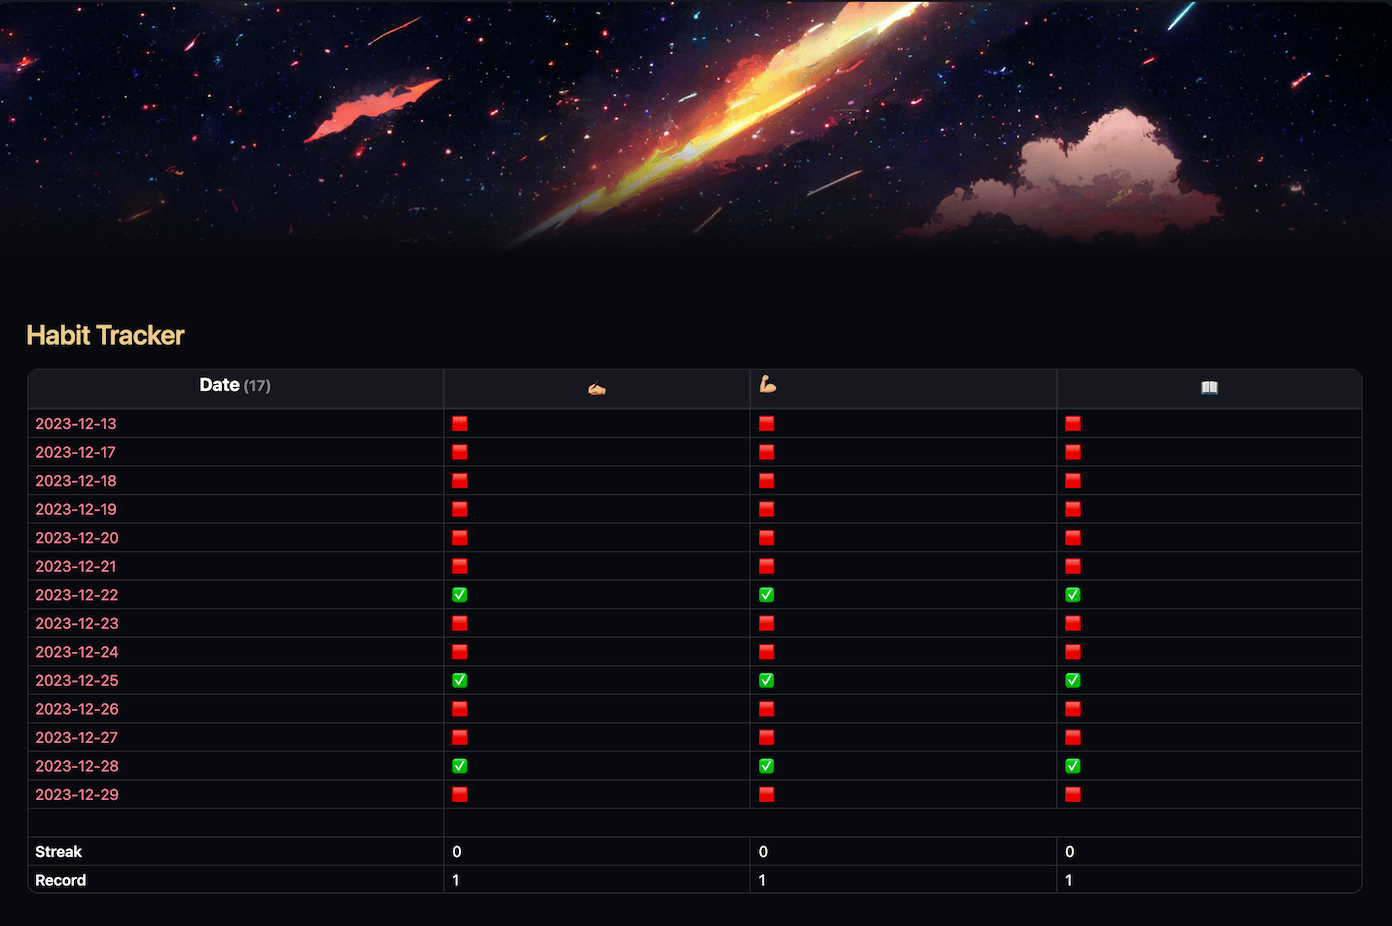
Habit Tracker
The habit tracker in the dashboard only renders habits from the past 1 week. This note will render habits for the entire year that you have tracked.
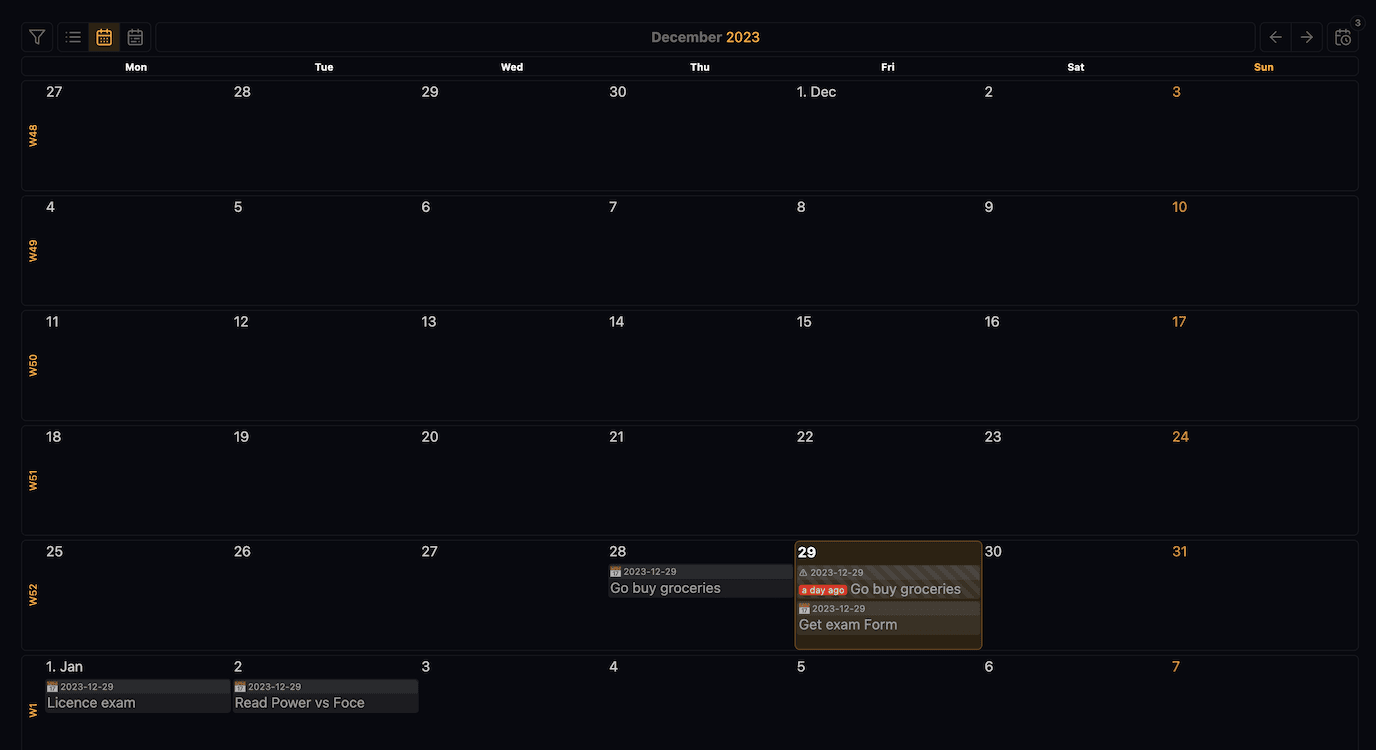
Tasks Calendar
This integrates with the task management system in Obsidian. It will render the tasks in the calendar in three different views: monthly, weekly, and daily.
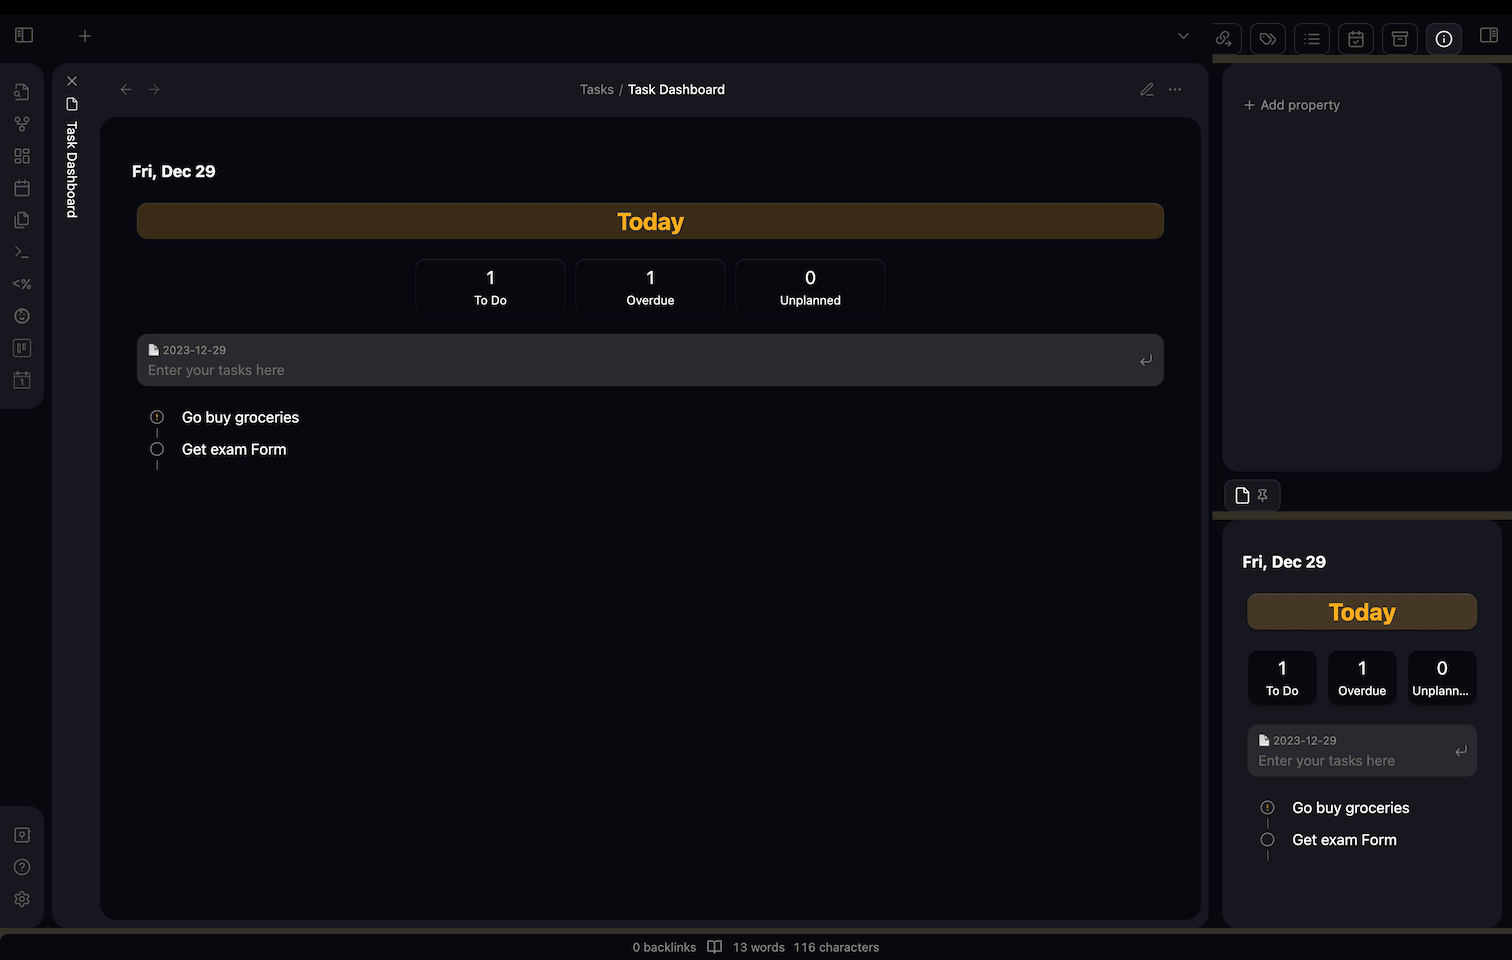
Today’s Tasks
This is a note I always pin to the sidebar. It gives me a glance at today’s tasks.
Kanban Tasks View
This is another element in the task management category. It is a kanban board view of Obsidian tasks. It’s achieved by using the Cardboard plugin.

Now you have an idea of all the elements in the Life OS dashboard setup.
Let me help you create one for you.
Creating a Goal Template
One of the main reasons why I created this setup is to help me stay on track with my goals. So, let’s start with goals.
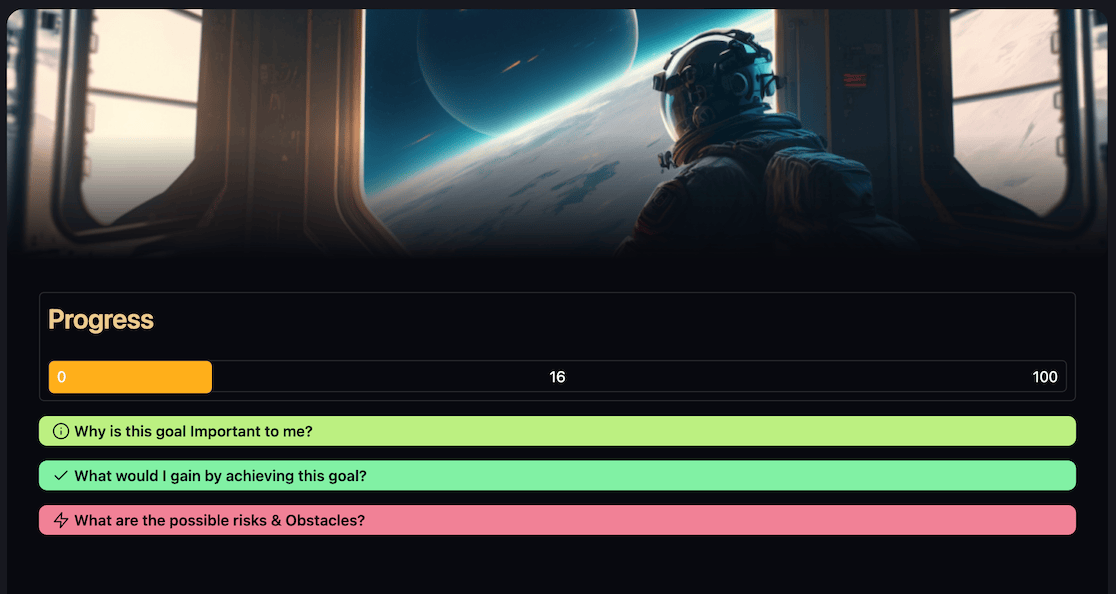
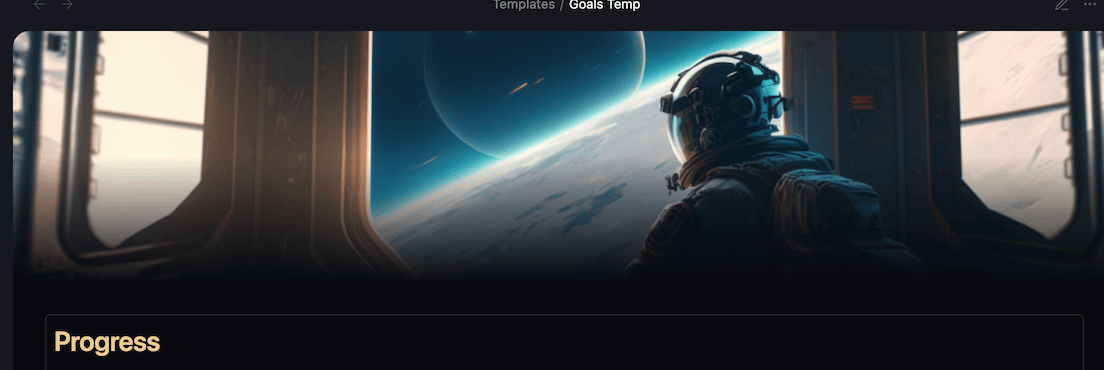
This is the goal template. Let’s dissect each element in this note.
Metadata
The metadata is currently not visible in the note. It’s hidden.
You can enable/disable this by going into settings> appearance> properties in documents.
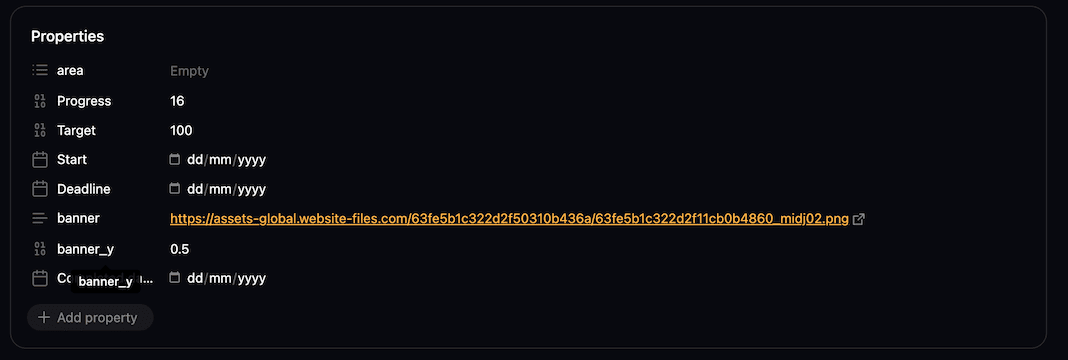
Here’s the YAML frontmatter(metadata) of the goal template.
---
area:
Progress: 16
Target: 100
Start:
Deadline:
banner: "https://assets-global.website-files.com/63fe5b1c322d2f50310b436a/63fe5b1c322d2f11cb0b4860_midj02.png"
banner_y: 0.5
Completed date:
---
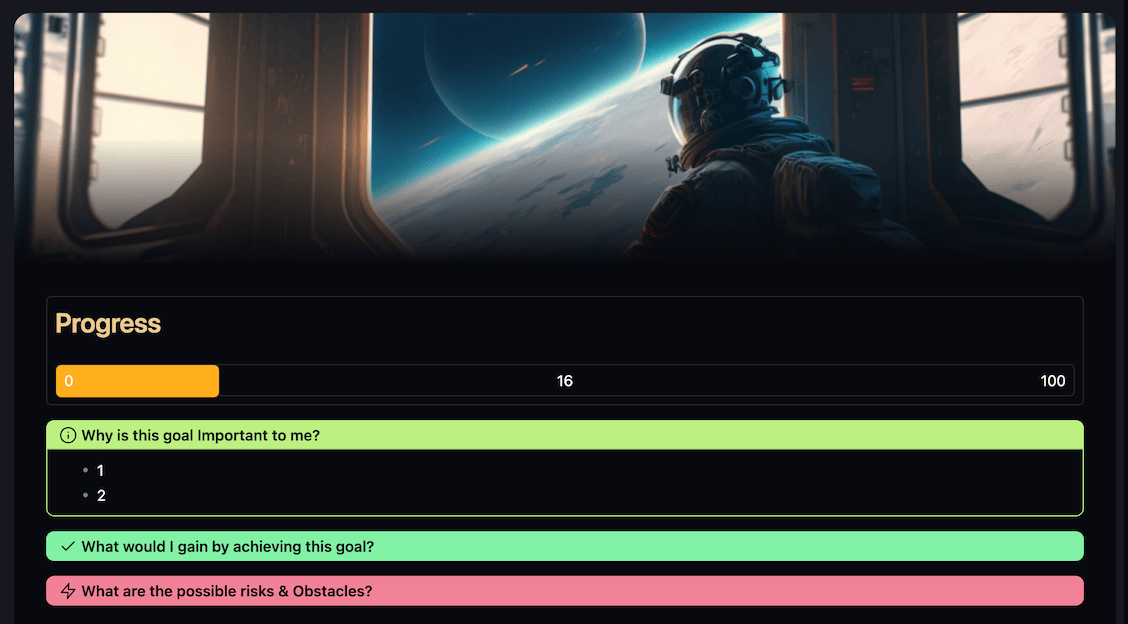
In live preview mode, it looks like this:
Banner
The first thing we have on our note is a Banner using an image taken from the internet. You can do this with the banner plugin. Use the gradient style from the plugin’s setting to achieve this kind of look.
You can change the banner by changing the banner property. You can either use local images or images from the internet.
Goal Progress Bar
This is a progress bar created with the help of the Meta-Bind plugin. This plugin will be used a lot in this setup.
The progress bar you see below is attached to the note property called progress. As you slide the progress bar, the metadata of the note changes automatically.
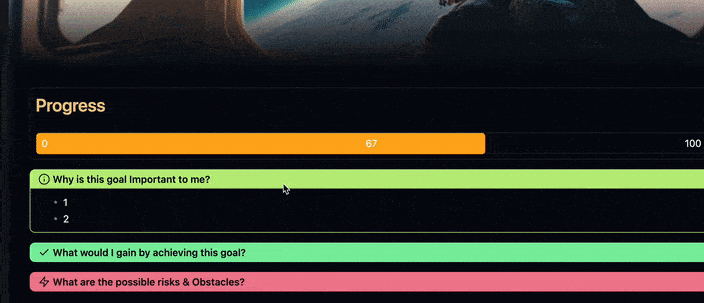
This way, you won’t ever need to update the metadata manually.
To create this kind of progress bar, you first need to install the meta-bind plugin. With the meta-bind plugin, you can do lots of things, but for now, let’s just create a progress bar.
For that, just add this code to your note.
```meta-bind
INPUT[progressBar(title(Progress), minValue(0), maxValue(100)):Progress]
```
You can check out the plugin’s documentation for more ideas.
Clarity on Goal
These are the three questions that I stole from the Improvee.io app. And they work so well.
Answering these questions makes the goal-achieving process straightforward.
You know your whys, outcomes, and the possible risks and obstacles you will face along the way. This makes you prepared for the journey.
Regarding the Why, I found an interesting trick that works so well.
You set a goal and ask yourself why is that goal important, at least 7 times.
Let’s say, my goal is to gain 20kgs weight in 2024. I’d proceed like this.
Why do I want to get 20 kg weight?
Because I’m skinny and want to get big.
Why do you want to get big?
Because I want to have confidence.
Why do you want to have confidence?
And on and on until you give answers to 7 whys.
This trick takes you down to the root of your why.
And as they say, if your why is strong, you will achieve it anyhow.
This is a simple trick I use to have a strong why for my goals. Let’s get back to the setup now.
These are the callouts I’ve used.
> [!info]- Why is this goal Important to me?
> - 1
> - 2

> [!success]- What would I gain by achieving this goal?
> - 1
> - 2

> [!danger]- What are the possible risks & Obstacles?
> - 1
> - 2
Goal template done ✅.
Now create a few goals with this template and store them inside a folder. And we’ll create a goal dashboard. I’ve created a folder called Review, and a subfolder called Goals to store my goal notes.
The path of the note is important while doing a dataview query to set up a homepage.
Creating a Goal Dashboard
This is a goal dashboard. At the top, we have a button created with the meta-bind plugin to open the daily notes and weekly note.
I will talk about this in the next article. We’ll create this on our homepage as well. So you can copy these buttons from there easily.
Then we created a dataviewjs query for our goals.
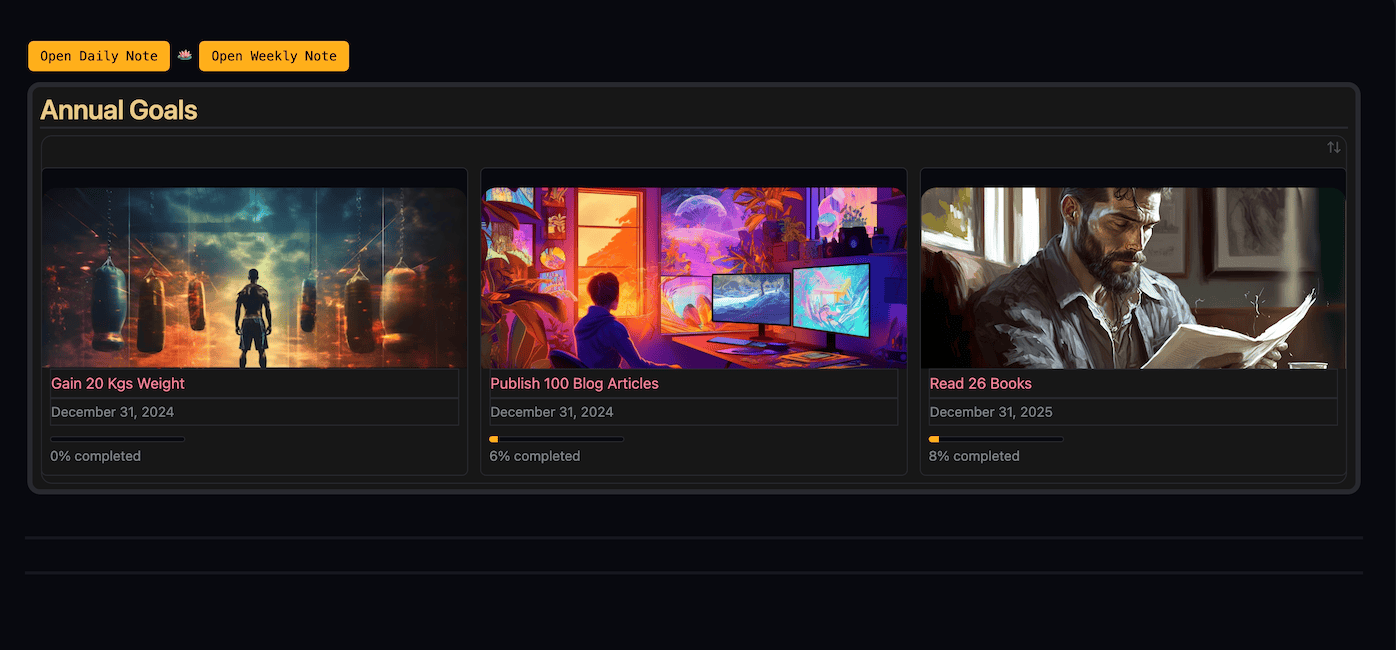
```dataviewjs

let goals = dv.pages('"Review/Goals"');

dv.table(["Goal", "Target", "Progress", "Deadline"],

goals.map(goal => [

`<div style="position: relative; overflow: hidden; width: 100%; height: 200px;"> <img src="${goal.banner}" alt="Banner" style="object-fit: cover; object-position: center; width: 100%; height: 100%;"> <div style="position: absolute; top: 0; left: 0; width: 100%; height: 100%;"></div>

</div>`, `<span style="font-size: 1.1em;">${goal.file.link}</span>`,

goal.deadline,

`<progress value="${goal.progress}" max="${goal.target}"></progress><br>${Math.round((goal.progress / goal.target) * 100)}% completed` ]) );

dv.container.classList.add("cards-align-top");
```
If you are new to dataview, you can check out the dataview documentation or my dataview guide for beginners article.
Also, you can ask your friend ChatGPT for help.
Okay wait, I just forgot to tell you something.
This view is only available if you are using the minimal theme. If you are using a theme other than minimal, you need to use the minimal theme cards CSS.
You can check out this tutorial video to get the cards views in any theme.
First step done.✅
We’ve set up goals and created a goal dashboard.
In the next article, we’ll talk about setting up a daily and weekly note and creating a habit tracker.
Obsidian Life OS Demo Vault
Here’s a link to Obsidian Life OS Demo Vault. Download it and follow along with all all tutorials I’ve provided.